You’ve spent hours researching robot mowers. You’ve read the forums, compared AWD vs. RWD, and even started clearing sticks from the perimeter of your yard. But before you click “Add to Cart” on a machine rated for a 45% incline, there is one critical, non-negotiable task left: you must actually measure the yard slope you’re asking that machine to climb.
Guessing is expensive. If you overestimate your hill’s steepness, you might spend $1,000 extra on an AWD beast you don’t need. If you underestimate it, you’ll be the person on Reddit complaining that your new $2,000 robot slides past the boundary wire every morning at 8:15 AM.
This guide provides a precise, practical, and low-frustration method for measuring your property. It’s designed for the homeowner who values efficiency and wants to make a data-driven decision, not just a hopeful guess. Let’s get the tape measure and the smartphone ready and learn how to measure yard slope accurately.
Why “Eyeballing It” Fails Every Time
The human eye is terrible at judging vertical incline from ground level. A hill that looks “gentle” while you’re pushing a heavy gas mower up it can feel like Mount Everest, while a slope that looks “severe” from your kitchen window might actually be a very manageable 15 degrees. This is why understanding how to measure yard slope using actual tools is the only way to match your terrain to the correct robot mower slope percentage.
As we’ve established in our main guide, the industry speaks in Percentage (Rise over Run), but homeowners think in Degrees (Angle). They are not interchangeable. An 11° slope is a 20% grade. A 27° slope is a 50% grade. Confusing the two is the #1 cause of robot mower returns in the smart home category.
Check out our FREE Yard Slope Calculator Tool
Enter your yard measurements to find your slope percentage and see which robot mowers are the right fit.
Method 1: The Smartphone Clinometer (The 2-Minute Tech Solution)
For the target audience comfortable with app-based smart devices, this is the gold standard. Modern smartphones contain MEMS (Micro-Electro-Mechanical Systems) accelerometers and gyroscopes that are more than sensitive enough to detect the precise angle of a hillside.
Step 1: Gather Your Tools
You cannot just set your phone on the grass. Grass blades bend, and soil has divots. You need a 4-foot straight edge. A spare 2×4 plank, a long carpenter’s level, or even a rigid piece of PVC pipe works perfectly. This board serves as a “terrain average”—it smooths out the tiny bumps so you get the true overall grade of the hill.
Step 2: Download a Dedicated App
While iPhones have a built-in level (swipe left on the Measure app), dedicated clinometer apps offer better visual feedback and often display both degrees and percentage simultaneously. This is a massive time-saver when learning how to measure yard slope.
- Recommended Free Apps: “Clinometer + bubble level” (iOS/Android) or “Physics Toolbox Sensor Suite” (Android).
- Pro Tip: Look for apps that allow you to lock the reading. This prevents the number from jumping around if your hand is shaky.
Step 3: Execute the Reading
- Place the board on the ground, aiming it straight downhill (parallel to the direction water would flow).
- Lay your phone flat on the board.
- Wait 2 seconds for the reading to stabilize.
Step 4: Convert and Record
Look at the screen. It likely shows a number with a little circle (°). Write this down. Now, use the conversion table below to find the true slope percentage.
| If Your Phone Shows (°) | The Actual Slope Is (%) | Verdict for Robot Mower |
|---|---|---|
| 8° – 11° | 15% – 20% | Easy; Any 2WD/RWD model |
| 12° – 16° | 21% – 29% | Moderate; High-traction tires needed |
| 17° – 22° | 31% – 40% | Difficult; AWD Recommended |
| 23° – 27° | 42% – 51% | Severe; AWD Required |
| 28° – 35° | 53% – 70% | Extreme; Premium AWD Only |
| 36°+ | 73%+ | Non-Mowable; Use Trimmer or Retaining Wall |
What does your slope actually look like?
Select a slope grade to see a visual diagram, real-world examples, and which robot mowers can handle it.
Slope diagrams are illustrative. Measure your actual grade with a free clinometer app before purchasing.
Method 2: The “Rise Over Run” String Method (Old School Precision)
If you are on a sprawling estate with a long, sweeping hill, or if you simply trust a physical bubble of air more than a silicon chip, this is the definitive surveyor’s method. It’s how landscape architects determine if a slope is buildable. This technique teaches you how to measure yard slope with zero digital interference.
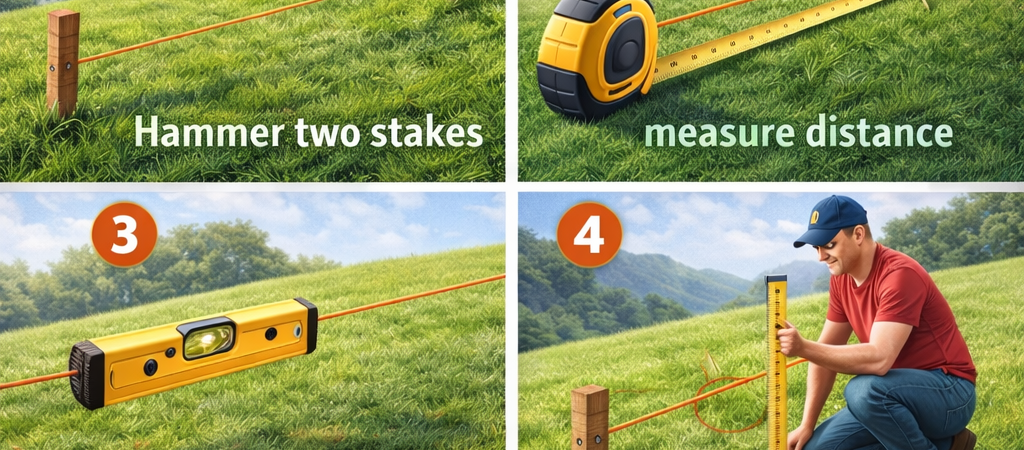
Step 1: The Hardware Run
- String: 25 to 50 feet of non-stretch mason’s line.
- Stakes: Two wooden stakes or long screwdrivers.
- Level: A line level (a tiny bubble level that hooks onto the string). You can find these for under $5 at any hardware store.
- Tape Measure: A standard 25-foot tape.
Step 2: Setting the Baseline
Drive the first stake into the ground at the bottom of the hill. Tie the string to the stake exactly at ground level.
Have a helper walk exactly 10 feet (120 inches) straight up the hill with the second stake and the string. This distance is your Run.
Step 3: Finding True Level
Pull the string taut and hook the line level onto the middle of the string. Have the helper slide the string up or down the top stake until the bubble is perfectly centered. This is the most critical part. When that bubble is centered, the string represents a perfect horizontal plane—like a laser beam shooting across your yard.
Step 4: Measure the Gap (The Rise)
With the string perfectly level, take your tape measure and measure the vertical distance from the ground (at the top stake) up to the string.
- Example Reading: The string is level, but it is 24 inches off the ground at the top stake.
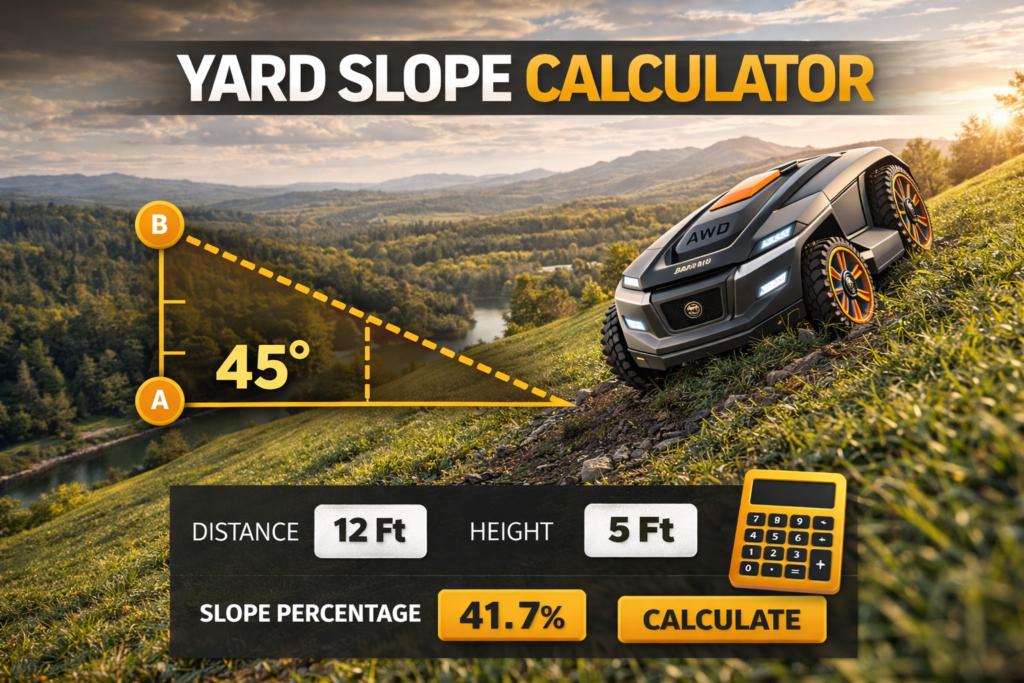
Step 5: The 10-Second Calculation
This is where the how to measure yard slope math becomes satisfyingly simple.
- Rise: 24 inches
- Run: 120 inches
- Calculation: (Rise ÷ Run) × 100 = Percentage
- (24 ÷ 120) × 100 = 20% Slope.
If the hill is so steep that the string is 5 feet off the ground at the top, shorten the run to 5 feet (60 inches) to make it easier to reach. Then just multiply the Rise by 20 to get the percentage.
The “Kill Zone”: Measuring the Edge of the Hill
Even if you master how to measure yard slope on the main face of the hill, you are not done. You must measure the transition zone at the bottom. This is where most robot mower installations fail catastrophically.
The physics are unforgiving: a 30-pound robot coming down a 35% slope hits the flat boundary at the bottom and tries to stop and turn. Gravity wants it to slide straight past the wire and into the fence (or the road).
The 3-Foot Edge Test
Using the Smartphone Method (Method 1), measure the slope of the last 3 to 4 feet of lawn before it meets your fence, wall, or flower bed.
- If the reading is > 10° (18% slope): You cannot place the boundary wire there. The mower will slide out of bounds, especially on dewy mornings.
- The Solution: You must pull the mowing zone boundary back up the hill until the measured edge slope drops to 15% or less. The remaining steep strip becomes a “trim zone” handled in 90 seconds with a string trimmer.
Common Measuring Mistakes to Avoid
Knowing how to measure yard slope correctly means avoiding these three pitfalls that invalidate the data:
- Measuring the Wrong Axis: The slope that matters for a mower is the fall line—the direction water flows. Do not measure across the hill (sideways) to determine climbing capability. A mower can usually handle a higher robot mower slope percentage when traversing sideways than when climbing straight up, but climbing is the limiting factor.
- Ignoring the Crown: If your yard has a raised “hump” or berm, measure the slope of the steepest approach to that hump. If the mower can’t climb the hump from the flat approach, it will “high center” and get stuck with its wheels spinning in the air.
- Measuring in the Rain: Soil expands when wet, and grass is slipperier. Take your measurements on a dry day. The slope percentage doesn’t change, but the traction reality does. Always subtract 10-15% from the manufacturer’s max robot mower slope percentage to account for morning dew and damp conditions.
Final Checklist: From Measurement to Purchase
You now possess the exact robot mower slope percentage of your property. Here is how you apply it:
| Your Measured Slope | Required Drive System | Recommended Action |
|---|---|---|
| 0 – 20% | Standard RWD | Enjoy easy setup; almost any quality mower works. |
| 21 – 35% | High-Traction RWD or AWD | Look for deep “cleat” treads on the tires; AWD is insurance. |
| 36 – 50% | AWD Only | This is non-negotiable. Spend the extra money here. |
| 51%+ | Premium AWD / Commercial | Consider specialized models like Mammotion LUBA or Segway Navimow X4; verify edge slope is under 15%. |
You’ve done the work that 90% of buyers skip. You know exactly how to measure yard slope and you’ve removed the guesswork. Now you can shop with the confidence that the machine you choose will actually perform on your terrain, not just on the manufacturer’s test track. That’s the difference between a smart upgrade and a frustrating return.
Find the perfect machine for your property using our Robot Mower Quiz

Learn More [ What Slope Can Robot Mowers Handle? The Truth About Robot Mower Slope Percentage]
Learn More [5 Best Robot Mowers for Large Sloped Yards (Real-World Tested on 1–3+ Acres)]